Transfer everything from old computer to new computer with Windows 11
Transfer programs and files to new computer
Transfer files from one computer to another
Transfer Microsoft Office to new computer
Restore programs and files from a broken or dead computer
Transfer directly from an old hard drive
Transfer to new computer using a USB hard drive
Corporate Windows 11 migration
User Profile Migration to new PC / new domain
How To Migrate Local Profiles to Azure AD
Migration to Server 2019 / 2016
Transfer programs and files to new computer
Transfer files from one computer to another
Transfer Microsoft Office to new computer
Restore programs and files from a broken or dead computer
Transfer directly from an old hard drive
Transfer to new computer using a USB hard drive
Move To New PC - Compare Options
Migration Kit Pro - Advanced Transfer
Transfer programs and files to new computer
Transfer files from one computer to another
Transfer Microsoft Office to new computer
Restore programs and files from a broken or dead computer
Transfer directly from an old hard drive
Transfer to new computer using a USB hard drive
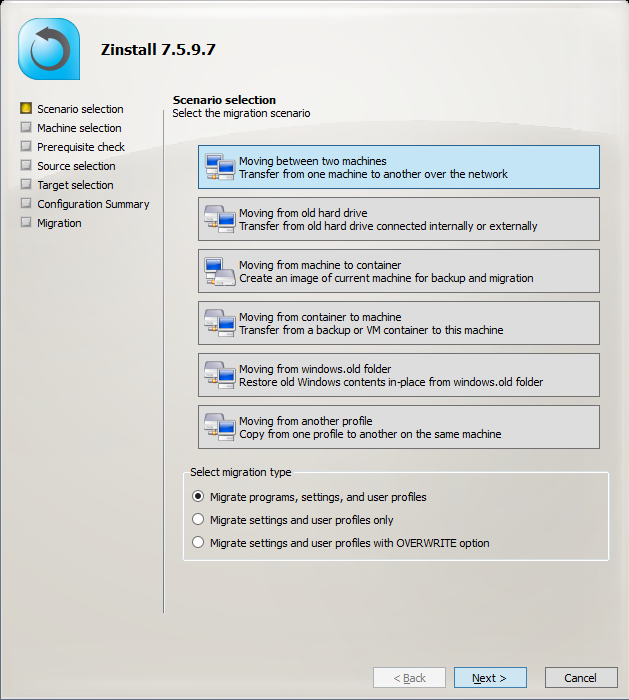
When you transition to Azure AD, one of the obstacles on the way is profile migration – how do you migrate your user profiles from a regular domain to Azure ADDS, without losing user data?
Of course, you can do this manually, by copying user data to the newly created Azure profile, and reconfiguring whichever settings the user needs (or by, ahem, just not doing that). What we are looking for here is a way to automate that migration, and be able to migrate from workgroup or domain profiles to Azure profiles automatically, efficiently and completely.
We’ll cover several scenarios – the typical situation of migration to Azure on existing machines (in-place migration), and the other option being migration from an existing workstation with regular profiles, to a new workstation connected to Azure AD.
Migration to Azure Active Directory – same PC
Migration to Azure Active Directory – one computer to another

The typical case of Azure domain migration happens with both profiles (original and Azure) being on the same workstation. This kind of migration is also the more straightforward; data is already on the machine, and you don’t need to deal with network transfers, connectivity etc. – just migrate files, account and settings on that same PC.This approach works for both Workgroup-to-Azure migrations and Domain-to-Azure migrations.
We will use Zinstall Migration Kit Pro to automate that process. Here is how to do that:
That’s it! The profile contents are transferred to the other workstation – and the migration is complete.
Note that you can also use the Kit in command-line mode, which is useful in SCCM and other management tools integration. See “Command Line Execution” in the user guide.
The other migration scenario is migration to an Azure profile on a different computer – e.g., when you are not just moving to ADDS, but are also doing PC refresh as part of that process.
In this case, the transfer can be done via a network, or via shared storage. We’ll cover the network option for simplicity (shared storage works very similarly, using the same product).
Note that Migration Kit Pro is able to transfer not just the profile, but installed applications as well. When moving to a new computer, this may be quite useful, as this will allow you to migrate the user’s entire environment, without the need to manually install apps on the target machine.
That’s it! The profile contents are transferred to the Azure AD profile on the other computer – and the migration is complete.
Note that you can also use the Kit in a command-line mode, which is useful in SCCM and other management tools integration. See “Command Line Execution” in the user guide.
Get Zinstall Migration Kit Pro here
(or contact us for more info, volume discounts and evaluation copies).